Saturday, March 24, 2012

Jam-Filled Thumbprint Cookies

As I continue in my Lenten discipline of eating no sugar and keeping mostly vegan, I've been getting more and more interested in playing around with old favorite recipes that normally contain lots of butter, sugar, eggs, or whatever, and making them tasty without all of those things.

My secret to success, in general, has been fruit, which can add sweetness and moisture. I also recently read that nut and coconut flours can make for very moist, rich-tasting baked goods. Since I teach at a nut-free school (but coconut is apparently ok), and had had a bag of coconut flour in the back of my fridge forever, I decided to try using some. I've also read that sorghum flour can do a good job of binding itself without added gums (xanthan, guar, etc.) and had a bag of that lying around, so I decided to go with that. And finally, I always think of jam cookies as being especially tasty with a little powdered sugar sprinkled on top at the end, but I didn't want to go that route, so I decided to use some unsweetened, shredded coconut, instead.

The dough of these ended up a little pasty and not very sweet, but I think the preserves balance it nicely. If you like a little more sweetness, try adding a Tbs or so of agave nectar.

These were very touchy to form, so I might try a little xanthan gum next time, after all.


JAM-FILLED THUMBPRINT COOKIES
Makes 3 dozen cookies

1 c coconut flour
1 1/2 c sorghum flour
1 tsp gluten-free baking powder
1 tsp egg replacer
1/2 tsp salt
2 c unsweetened applesauce
1/2 c olive oil
1 tsp vanilla
1/2 c unsweetened shredded coconut
1/3 c all-fruit preserves

Combine flours, baking powder, egg replacer, and salt in a medium bowl and whisk to combine.

In a larger bowl, combine applesauce, oil and vanilla. Stir briskly to blend, then start adding dry ingredients bit by bit, stirring vigorously to combine. The resulting dough will be very crumbly, but should hold together when a small handful is gathered up and pressed into a soft ball. (Squeezing more firmly will cause it to fall apart again, but this is ok.)

If you're a slowpoke like me, you'll want to wait until after this next step to preheat the oven. If you work a little faster, you could preheat at this point or about halfway through the shaping process. Baking temperature will be 350°F.

Spread shredded coconut onto a medium-sized plate. Take up a small amount of dough and very gently press and roll it into a ball, about 1 inch in diameter (slightly smaller than a ping pong ball). Once it's holding together, place it in the coconut and roll it around a little, then, right there in the plate, shape it into a "thumbprint" shape. This means pressing your thumb down somewhat firmly in the middle while supporting the outside edges with your fingers, pressing things together again as they start to crack. There should be enough of an indentation to hold about 1/4 to 1/2 tsp of fruit preserves.

Transfer to an ungreased baking sheet and repeat until dough is all used up, moving to a second baking sheet when necessary.

Preheat the oven now, if you didn't do it earlier.

Measure out the jelly into a cup, and mash it with the back of the spoon to soften it if necessary. (Some brands of all-fruit preserves are a little excessive in the pectin department, or contain extra starch to stabilize. It's easier to measure little spoons of the preserves if you break this down a little.) Use a spoon to place a little in the dimple of each cookie, taking care to make as little contact with the cookies as possible, as they're very fragile.

Bake 20 minutes, or until golden brown. Cool thoroughly on the sheets, set on wire racks, then remove very carefully to a plate or tin. Enjoy one or two with a cup of tea for an afternoon or mid-morning treat!

Spicy Kale Chips

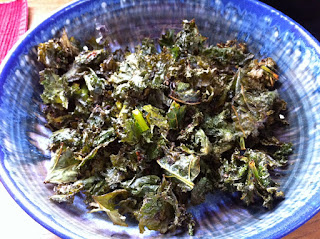
I put off making kale chips for a long time, because I somehow got the idea that it would be complicated and labor-intensive. I was so wrong! These were wicked easy and took very little hands-on prep.

This recipe came about after browsing a few other, similar recipes online, then throwing in some things I like. I only used 1 tsp of chili powder, and can't even taste the spiciness, so I'm guessing a Tbs is a better place to start if you really want a little kick. Mine also came out a little chewy after 20 minutes of baking, so I recommend trying 25 minutes and seeing how it goes. (I'll also come back and adjust this recipe, next time I make these.)

If you have a salad-spinner whose bowl doesn't have a drain, like mine (which is made by Oxo), you can do almost all the prep right in the bowl.


SPICY, GARLICKY KALE CHIPS

1 bunch of kale, stiff spines cut away and leaves roughly chopped or torn into pieces
2 large cloves of garlic, peeled and minced or pressed
1 Tbs chili powder
1/4 tsp salt (or more, to taste)
1 Tbs olive oil

Preheat oven to 375°F.

Place the kale into the bowl of the salad spinner and fill with cold water, then dump into the strainer and spin until thoroughly dry. Lift out strainer and set aside.

Rinse and thoroughly dry the bowl of the spinner. Mix the garlic, chili powder, salt and oil in the bowl until well-blended, then toss in a few leaves of the kale to start getting the oil mixture distributed. Dump in the rest of the kale and toss well until all leaves are coated.

Spread on a baking sheet with edges (or a jelly-roll pan) and bake for 25 minutes in the lower third of the oven, stirring well with a wooden or bamboo spatula a couple of times during baking.

Cool thoroughly, and enjoy!

Sunday, March 18, 2012

Pistachio-Stuffed Figs

When you give up sugar for Lent (or for a cleanse, for health in general, whatever), dried fruits start to taste reeeealllyyyy good.

PISTACHIO-STUFFED FIGS
(or Almond-Stuffed Dates, etc.)

3 large, dried figs (such as Smyrna)
15 g shelled pistachios

Use a small, sharp knife to remove the stem of each fig. Carefully stuff 1/3 of the pistachios into the stem-hole of each fig, then pinch closed.

A variation is almond-stuffed dates:

2 dried dated (such as medjool)
4-6 whole raw almonds

Use a small, sharp knife to make a slit in each date and remove the pit. Slip 2-3 almonds into each date and carefully pinch closed.

Serve with hot tea, if desired.

Thursday, March 15, 2012

Spinach Salad Rice Paper Rolls

Awhile ago, I wrote one post about "Pantry Creativity," and then promptly stopped updating this blog, yet again. But I still have "more rice-paper wrappers than I believe are currently available in the entire country of Vietnam," and I'm still trying to find ways to use them.

I also had a whole container of baby spinach leaves, some peanut butter and raisins (no, I swear, it was really good!) and not a lot of energy for making full-on nime chow, so I improvised.


SPINACH SALAD RICE PAPER ROLLS

32 g natural peanut butter
2 Tbs rice vinegar
1 Tbs wheat-free tamari
40 g unsulphured raisins
85 g baby spinach leaves
about 8 quarter-round rice papers

Combine peanut butter, rice vinegar, and tamari, and stir vigorously until well-blended. Stir in raisins, then toss in spinach until thoroughly coated.

Have one dinner plate and two salad plates ready: the dinner plate is for soaking the rice papers in boiling water briefly; one salad plate is for rolling the wraps, and the other is for serving.

Boil water in a kettle. Place one rice paper sheet on the dinner plate and cover with boiling water. Let soak about 1 minute, until soft enough to roll but still reasonably sturdy. Remove sheet to the rolling plate and put another rice paper sheet into the water, poking it down until covered (add a little more boiling water as necessary). Meanwhile, put a small handful of spinach filling onto the softened wrapper and roll, compressing the spinach into as small a space as possible and gently tugging on the wrapper to make a tight roll. (It's ok if they still come out sort of loose.) Leave extra paper around the edge so that paper will contact paper in the outside layer; as they cool, they'll start to stick together and make a reasonably cohesive roll. Repeat until all filling is used.

Apple Juice-Sweetened Pumpkin Nut Muffins


Yet more variations on the theme of (a) Pantry Creativity and (b) my Lenten fast. I had about 1/2 c. canned pumpkin leftover from a holiday-season recipe, which I had carefully frozen for future use. Knowing that applesauce can make a good egg substitute in baked goods, I thought pumpkin mash might work, too. Working with a pumpkin pie recipe for spice ideas, I came up with this recipe.

Note: These are not particularly sweet, at all. I think they taste great with a cup of rooibos tea with milk and a banana or a little greek yogurt on the side, but if you want something sweeter, try adding a tsp or two of agave nectar. Also, they're not terribly strong in pumpkin flavor, just nice and moist. If you really want a pumpkin taste, try doubling the pumpkin and reducing the apple juice.

My secret weapon in all muffin-baking is my silicone muffin cups. I just line them up on an old cookie sheet, fill and bake. Gluten-free muffins pop right out of them, which is great because those little paper cups tend to stick to frozen baked goods, and I always end up freezing muffins for future consumption.

Thanks are due to Rebecca Reilly's Gluten-Free Baking for the framework of this recipe, especially the flour ratios.

Apologies for the blurriness of this photo. It was morning, after all...


APPLE JUICE-SWEETENED PUMPKIN NUT MUFFINS

1 c brown rice flour
1/2 c stone-ground cornmeal
1/2 c tapioca starch
2 tsp gluten-free baking powder (such as Argo)
1 tsp egg replacer
1/2 tsp xanthan gum
1/2 tsp baking soda
1/2 tsp cinnamon
1/4 tsp ginger
1/4 tsp nutmeg
dash allspice
pinch salt
1/2 c canned pumpkin
1/4 c canola oil
1/4 c ground flaxseed
1 tsp apple cider vinegar
1 1/4 c apple juice
1/2 c apple-sweetened dried cranberries
1/2 c pecan pieces

Preheat the oven to 375°F and prepare 12 regular-size muffin cups (grease, paper, or use silicone as mentioned above).

Combine dry ingredients (top half of list, through salt) in a medium-sized bowl and whisk gently to blend.

In a small bowl, combine pumpkin, oil, flaxseed, vinegar, and a little of the apple juice. Stir well with whisk. Whisk in some more apple juice until a thick, liquify consistency is reached. Make a well in the dry ingredients and add pumpkin mixture, stirring from the center to incorporate dry ingredients. Once most of the dry ingredients are incorporated, add more apple juice if needed to make a thick but almost-pourable batter. Stir in cranberries and pecans.

Spoon into muffin cups and bake 18 minutes. Cool on a wire rack, turned out of muffin cups if possible.

Sunday, March 4, 2012

"Sweet" Rice Flour Crêpes


"Sweet" rice flour is a flour made from glutinous or "sticky" rice. It's available at many Asian grocery stores. I found a 5-lb bag of it in a Korean grocery store in Ayer, MA, quite a few years ago and have been chipping away at it ever since. It keeps just fine when closed well and kept in the fridge (most gluten-free flours do better stored in the fridge rather than at room temperature), but somehow there's a little voice inside my head that keeps saying, "use that stuff up!" so I'm always trying to think of new ways to do it.

It's Lent again, so I gave up all kinds of things again for my Lenten fast (a nearly-vegan diet focusing on whole grains, legumes, vegetables, dried fruits and occasional nuts, plus skim milk and homemade skim-milk plain yogurt; no sugars, honey, maple syrup, etc., no caffeine, no alcohol, small portions, no snacking). On Sundays, there is a rule that says you're supposed to indulge in small amounts of what you gave up, to remember that Sunday is always a special day, even in Lent. Me, I like to go for some butter, cheese and eggs. Two of those are represented in this recipe.

UPDATE: I've increased the amount of milk from 1 c. to 1 1/2 c., because I seem to use at least twice what I originally indicated. Start with 1 1/2 c., but be ready to add significantly more. The sweet rice flour just seems to absorb a lot of liquid.

This recipe is heavily based on the basic crêpe recipe from Mark Bittman's How to Cook Everything Vegetarian, which I highly recommend. I made half this quantity (which, in turn, is half of Bittman's recipe), but it involved using half an egg, which is more trouble than most people would consider worthwhile. I knew I was going to use a great, chunky farmstand applesauce for the filling, so I added the cinnamon, nutmeg, vanilla and agave nectar. I recommend adding some kind of flavoring (garlic would be a tasty addition for a savory crêpe), because sweet rice flour is actually a little bland-tasting on its own, despite the name.

If you've never made crêpes before, be ready for a learning curve. (I, for example, just learned while typing this post that the first e in "crêpes" has a circumflex, not a grave accent, on it. After all these years of thinking I was clever. Oops.) But seriously, the first couple may just look horrible, and that's really okay. Make sure your griddle is flat, preferably with low sides, that your batter is very thin, that the heat is at a nice medium level, and that you use butter generously, and eventually you'll probably get the hang of it. At least, I pretty much have, and I'm no great shakes at this kind of thing.

UPDATE: I made these again and took a photo this time!


SWEET RICE FLOUR CREPES (GF, nut-free, vegan)
Serves 2

1/2 c. sweet rice flour
1/2 tsp. cinnamon
1/8 tsp. nutmeg
1/4 tsp. xanthan gum
a pinch of salt
1 egg
1 tsp. agave nectar (adjust to taste)
1/2 tsp. vanilla
1 Tbs. butter, melted and cooled
1 1/2 c. milk, more or less as needed

Whisk the dry ingredients together in a bowl. Beat the egg lightly, then whisk in agave nectar, vanilla, butter and half the milk, and whisk liquids into dry ingredients, mixing until very well blended. Add more milk as necessary to achieve a very pourable batter. If there is time, refrigerate batter for a couple of hours before cooking.

Turn on oven to warm setting and place an oven-safe plate on the middle rack.

Place a griddle over medium heat. When hot, coat well with butter. (I just pick up the whole stick and quickly rub one end all over the hot griddle.) If you overdo this, you'll notice the batter sliding around a little as you add it, so this is one of the many variables to adjust until you find what works best for you.

Check consistency of batter and add milk if needed. I ended up adding quite a lot, maybe even half again what I mention above.

When adding batter to the griddle, the trick will be to tip the pan around quickly so that the batter coats it in as thin a coating as possible. For the first, test crêpe, ladle a small amount of batter, maybe 2 Tbs. worth, into the pan with one hand while tipping the pan around with the other. Cook until the top side looks dry, then flip with a wide pancake turner. Cook until golden brown, then flip back if necessary to brown the first side. Avoid letting the crêpe become crispy. When done, transfer to the plate in the oven or, if it's really too ugly to serve (which it really might be), have yourself a snack, give the dog a treat, or just throw it away.

Add a little more butter to the griddle and now, if you're feeling brave, try a full ladle (about 1/4 c.) of batter, to create a full-sized crêpe. Continue as above (hopefully without feeding the dog again), then start the next crêpe in the same manner. Stack the finished crêpes neatly on the warm plate until all are ready to fill and serve.

To serve, fill with sweet or savory fillings of your choice, roll and sprinkle the top with sliced, toasted almonds, powdered sugar, fresh herbs, or drizzle with syrup or sauce.