Tuesday, January 1, 2019

Black-Eyed Peas, 2019 Version

As long as I can remember, my parents have made and eaten Hoppin' John for New Year's Eve/Day. I have a brief and vivid memory of my godfather smiling at me, just after midnight one year, with a plate and fork in his hand. Black-eyed peas—the central ingredient of the dish, along with rice and spicy sausage—were meant also to be a key ingredient for good luck in the new year.

I thought they were yucky. But then, I was that kind of kid.

Years after becoming a vegetarian, I warmed up to legumes of various kinds, but the hot Italian sausage in my mom's recipe meant I always had to improvise a bit. I took years, but by about a decade ago I was able to make a version I enjoyed, partly thanks my 1998 discovery of the "Garlicky Black-Eyed Peas and Greens" recipe in the Moosewood Restaurant Low-Fat Favorites cookbook.

This year, I was introduced to Beyond Meat Hot Italian Sausage, which inspired me to try my mom's recipe… and then I forgot to get it from her, and I wanted to include the greens, and I generally decided to go my own way.

~*~

Ok, I admit it. I had pretty much abandoned this blog. But today, I posted this photo of this year's version of black-eyed peas:
…and my friend Vickie very kindly and quickly responded that she wants my recipe. So, here we go.

Black-Eyed Peas, 2019 Version

Ingredients:

2 Beyond Meat Hot Italian Sausages
1/2 medium onion
Crushed red pepper
Salt
1 red bell pepper
3 cloves garlic
1 can (15.5 oz) black-eyed peas
1 large bunch collard greens
Fresh-ground black pepper

Method:

Heat a cast-iron skillet over medium heat. Slice the "sausages" about 1/4-inch thick and, when the skillet is hot, add the slices.

Dice the onion. After the sausage has cooked long enough to turn over (about 7 minutes), use a spatula to turn each slice over and move them to the edges of the skillet. Add the onion to the middle of the skillet and keep cooking, adjusting the heat downward slightly after a few minutes. Stir around occasionally as needed. Add crushed red pepper (I did a pretty liberal shake over the whole skillet) and salt to taste (maybe 1/4 to 1/2 tsp at first) after the onions have softened.

Dice the red bell pepper and add to the skillet, giving everything a gentle stir.

Peel and mince the garlic and set it aside until ready to add the beans (black-eyed peas) to the skillet.

Empty the can of black-eyed peas into a colander, rinse well with cold water, and drain thoroughly. Once the red bell peppers are becoming tender, add the garlic and the beans to the skillet and stir with the spatula. My skillet was becoming very full by this point, so I had to operate carefully!

Using a sharp knife, remove the spines from all collard greens leaves, stack several, and slice them thinly. My slices ended up about 1/4-inch wide by a couple inches long (I had to cut some leaves again lengthwise to get uniform lengths). Place all strips into the colander and rinse well, then shake off some of the excess water. Add the greens to the skillet along with some more salt, then cover a wait several minutes for the greens to steam.

Once the greens are brighter in color and have softened somewhat, add pepper to taste and stir everything carefully (and as thoroughly as possible) with the spatula until everything is as mingled as possible. Taste and adjust seasoning as needed.

Serve warm. Makes probably six servings or so.

~*~

Good luck in 2019!

Wednesday, March 19, 2014

PB&J Banana Bread

I'll be honest: there was a moment, as I slid the loaf pan into the oven, when I thought: This is going to be heavy and dry. And possibly inedible. I should really have tried the original recipe first, or at least gone with a more familiar substitution like apple sauce.

I was very relieved to discover how wrong I was!

Welcome back to Lent, when my baking experiments get a little weird. Once I again, I set aside consumption of various things I normally love, including sugar and (at least most of the time) butter, cheese and eggs.

I was trying to explain the reasoning behind this to a friend a few weeks ago, and it didn't go very well—partly because my friend was feeling silly while I was trying to answer seriously, and partly because my usual words were not quite resonating for me. And then, on the first Sunday in Lent, I heard another friend, Rev. Meaghan Kelly of New Church, preach on the subject of giving up coffee—not for Lent, just in general. To paraphrase, she said something like, I realized I needed a cup of coffee to feel like the world is a good place. And if I'm depending on a beverage to feel like the world is a good place, I probably need to stop drinking coffee for awhile. [She may not have said "for awhile." My brain can't fathom the alternative, though, so I'm going to pretend she did.]

And I guess that's what I do when I set aside (I prefer that phrase, rather than "give up") consuming coffee, tea, alcohol, sugar, television, fiction literature ... all things I enjoy and consider to be evidence that the world is a good place. I need to stop escaping and start reconnecting with friends, family and God.

Which probably makes recipes like this one a little beside the point. Because I definitely would have a harder time considering the world a good place if I couldn't have peanut butter. But, six and a half weeks is just a really long time to go without the occasional sensory pleasure. And the flavor and belly-filling heartiness of peanut butter come through really nicely in this modified recipe based on Rebecca Reilly's Peanut Butter Banana Bread.

A couple of notes: I buy my natural peanut butter (peanuts and salt, only) and fruit-sweetened fruit spread (which I call "jelly") at Trader Joe's, but you can find them in a lot of stores. This bread is not at all sweet, but does have nice, subtle flavors that hint mostly at peanuts and banana. I used strawberry fruit spread, but couldn't really taste it in the bread, so any flavor should be fine.

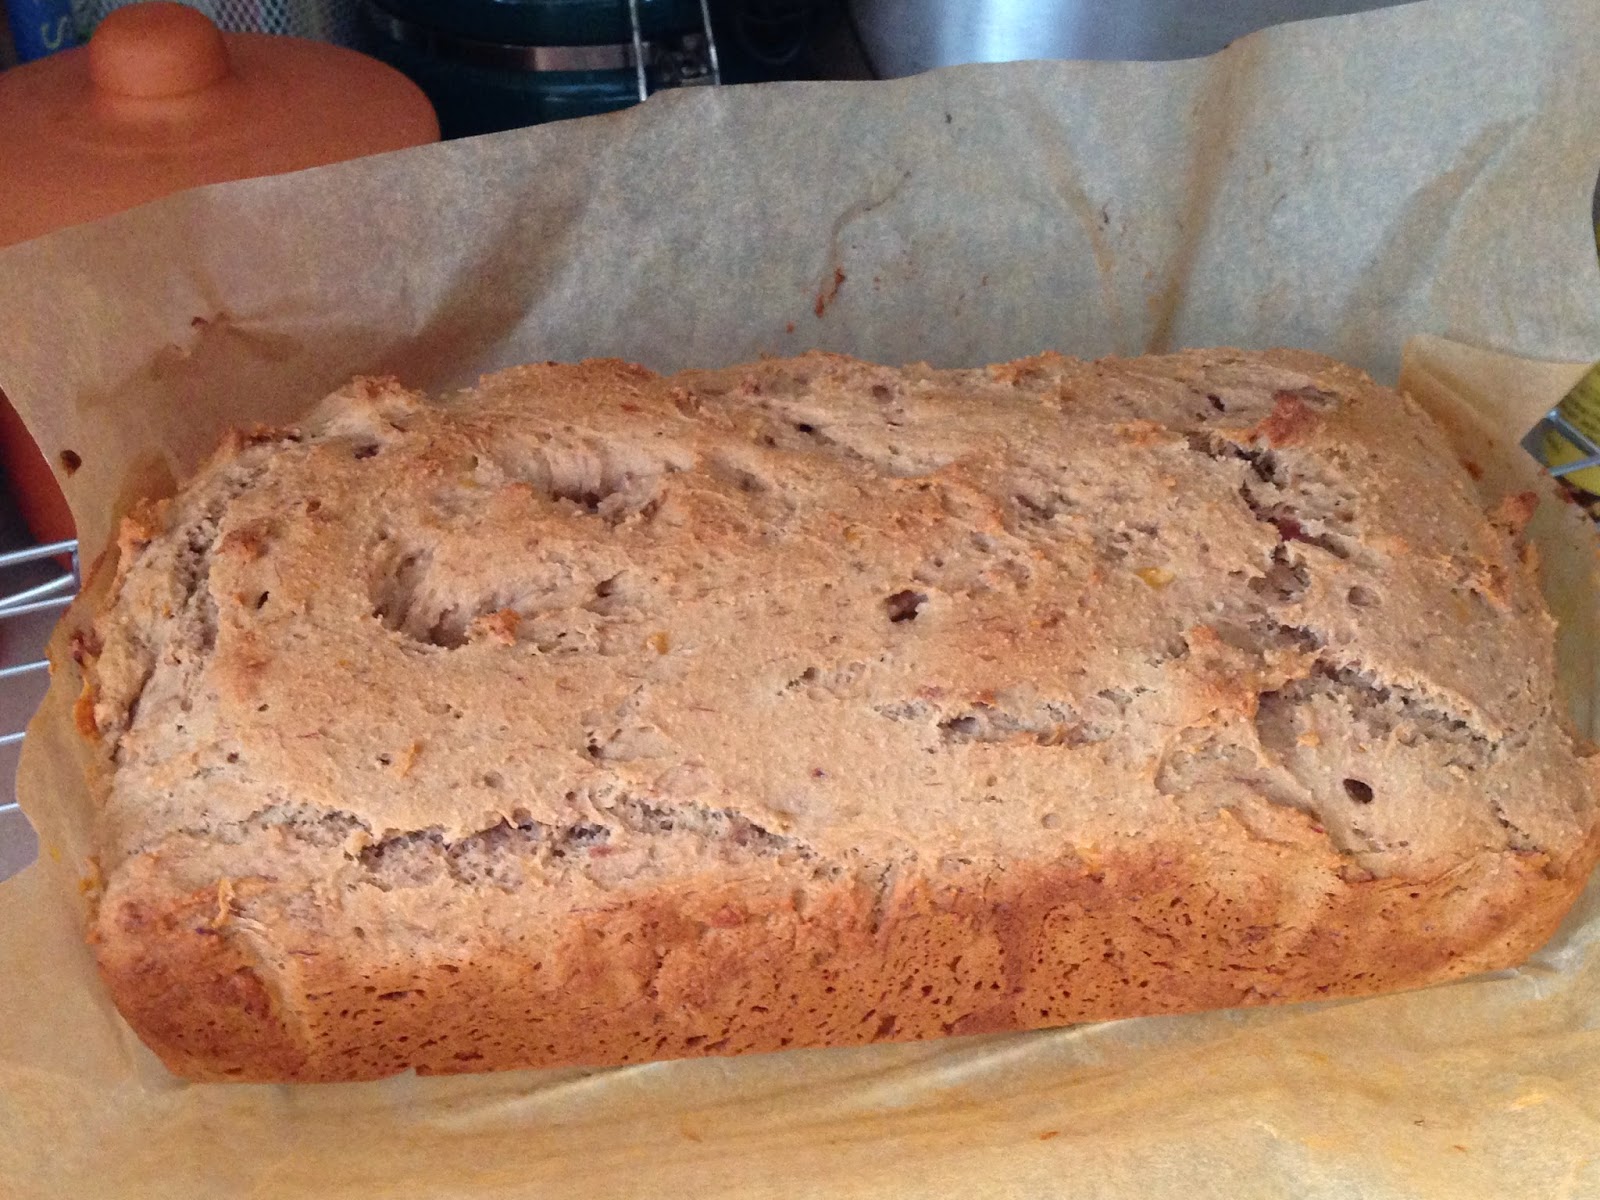
I was really pleased with how fluffy and nicely-browned this turned out!
The concentrated fruit-sugar in the jelly must have been enough to get some nice browning going.

PB&J Banana Bread


1 c. brown rice flour
2/3 c. potato starch
1/3 c. sweet rice flour
1 tsp. baking powder
3/4 tsp. baking soda
1/2 tsp. xanthan gum
1/4 tsp. coarse sea salt
1/2 c. natural peanut butter
1/2 c. fruit-sweetened fruit spread
2 ripe bananas, peeled

Preheat over to 350°F. Line a 9"x5" loaf pan with parchment paper.

Combine all dry ingredients (brown rice flour through salt) in a bowl. Stir gently with a whisk to homogenize a little.

Place peanut butter, fruit spread and peeled bananas in the bowl of a mixer. Mix on low, then speed up to medium for a couple of minutes, until bananas have incorporated completely and mixture is starting to lighten. Turn off mixer.

Add dry ingredients, then turn mixer on low speed and mix until just completely incorporated.

Use a rubber spatula to spread the batter into the pan. It will be very stiff and seem a little sticky and dry. This is okay, as it turns out!

Bake 40 minutes, until a toothpick inserted in the center comes out clean. Use the parchment paper to lift the loaf out of the pan, and cool on a wire rack at least 10 minutes before slicing.

Makes about 10 generous slices.

Delicious with a glass of milk, or some herbal tea! [Herbal tea is not made from tea leaves, so I do drink it during Lent. Trader Joe's Ruby Red Chai with milk was a perfect accompaniment, this morning.]

Tuesday, December 24, 2013

Cheese Straws

Ah, cheese straws. Is any food so reminiscent of my childhood? One bite, and I'm back in my grandmother's kitchen. And oddly enough, she didn't make them as straws, but as crisps, flattened with the back of a fork (and containing, if I'm not mistaken ... Rice Krispies??).

So, if you don't have a cookie press, you can still make these. Grandmother always did. She must have also made them without a food processor, but I don't, and I'm not even exactly sure how to modify the technique, so I'll leave that to you.

Right away, I know I'll get push-back for using a cheese other than cheddar, but give this a chance. Cheddar has a higher fat content and a sharper taste, and actually gets in the way of the ideal texture and flavor. Try it my way. Once. Then, do as you will.

I switched from butter to shortening after my first attempt (using butter) went flat in the oven and came out a little too delicate in texture. I may try a combination, next time, but I'm pretty happy with these results.

Recipe inspired by related recipes in The Joy of Cooking (Rombauer & Becker) and in Gluten-Free Holiday Baking (Ellen Brown).

CHEESE STRAWS


about 1/2 lb gruyere cheese
1/2 c. standard GF blend (I used Bob's Red Mill)
1/4 c. sweet rice flour
1/4 tsp. salt
about 1/2 tsp cayenne pepper
4 Tbs. non-hydrogenated vegetable shortening (e.g, Spectrum brand)
a few Tbs heavy cream

Preheat the oven to 350F. Line a few baking sheets with parchment paper.

Grate the cheese, using the medium grate attachment of the food processor. Remove the shredded cheese from the food processor bowl. There should be about 1 1/2 cups. There is no need to wash the food processor.

Combine flours, salt and cayenne in the food processor bowl and fit the blade attachment. Pulse a few times to mix. Add the shortening, then process until the mixture becomes fine granules. Add the cheese, and process until homogeneous. The dough will be dry.

While processing continuously, add a tablespoon or two of cream. Continue to add small amounts of cream until the dough just comes together in a ball that travels around the bowl, with the blade.

Remove the dough to a cookie press and spritz out in straws. Return any short pieces to the bowl, to try again. They can be placed pretty close together, as they shouldn't spread too much.

Bake at 350F for 15 minutes, until golden. Cool thoroughly, and store airtight.

Enjoy!


Sunday, September 1, 2013

Whole-grain GF Waffles

Waffles are really not that hard to make. So why have I been so intimidated by them, most of my life?

Sure, you have to get the dry/liquid balance right. There's the question of whether or not it's necessary to separate the eggs & beat the whites. The waffle iron has to be adequately seasoned or oiled, so the waffles don't stick. And, if you get ever-so-slightly over-generous when pouring the batter, you'll meet with the inevitable heartbreak and anguish of waffle-iron overflow. Oh, the tears and recriminations! [Pretty sure that last line was stolen from an episode of Buffy I just re-watched.]

Okay, there are challenges. Granted. But now that I've made waffles a handful of times from batter, I think I've developed a pretty good feel for avoiding these most common pitfalls. (The egg question, by the way? Doesn't seem to matter for my standard waffle iron. I think it might make a difference when using a Belgian waffle iron.) The logical next step, I decided, was to take a little more control over what goes into the waffles—more whole grains, no sweeteners because the syrup takes care of that—and that means making them from scratch.

Equipment recommendation: If your waffle iron needs to be greased, and you're like me and don't tend to keep cooking spray around, get a silicone pastry brush. I grabbed a pair from Ikea the last time I was there, and while they're not wonderfully delicate for use in actual pastry, they are fantastic for lightly brushing oil or melted butter onto a hot waffle iron.

If you have a shelf or two full of gluten free cookbooks, as I do, then you may have noticed the two things I've noticed: (1) a lot of GF cookbooks don't bother with pancakes or waffles, and (2) when they do, the recipes often seem to be unnecessarily complex. I'm just not going to mess with all that when I'm hungry after church on Sunday. But, fortunately, Artisanal Gluten-Free Cooking, by Kelli Bronski and Peter Bronski, contains a pretty straightforward waffle recipe that I was able to use as a guide. I halved their recipe and still made enough for four full-sized waffles on my Cuisinart Round Classic Waffle Maker [link provided as a size reference]; I also changed the flour blend, because my main objective was to used whole-grain flours.

Bob's Red Mill, which is pretty widely available these days, makes all of the types of flour I used, plus xanthan gum and a baking powder I believe is GF. Argo baking powder, which is what I had on-hand, is also GF.

WHOLE-GRAIN WAFFLES


1/3 c. millet flour
1/3 c. sorghum flour
1/4 c. teff flour
1/4 tsp. xanthan gum
1/4 tsp. salt
1 1/2 tsp. GF baking powder
1 egg, separated if making Belgian waffles
3/4 c. milk
2 Tbs. unsalted butter, melted, plus a little extra for brushing the iron, if needed
maple syrup, fruit, or other topping as desired

1. Measure the flours, xanthan gum, salt, and baking powder into a mixing bowl. Whisk to blend.
2. Plug in waffle iron and set to desired darkness (if settings are available), a little lighter than for refined-flour waffles.
3. If separating the egg, place the white into a separate bowl, big enough to accommodate beaters or some vigorous whisking. Beat until stiff peaks form, then set aside.
4. Add the egg yolk (or whole egg) and milk, and mix well. Drizzle in the melted butter and mix until well-combined. If the white was beaten separately, fold it in, gently, until just incorporated.
5. When the waffle iron is ready, brush it lightly with melted butter, then add enough batter to fill the center of the iron bed, leaving about a 2-inch border when the batter has been spread out a little. It will expand toward the edges! Adjust the quantity as needed for your particular machine.
6. Leave the waffle iron alone until it indicates that the waffle is done, then gently remove it with a heatproof utensil such as a silicone spatula. If you have hungry people waiting, pop the hot waffle onto someone's plate and pass the syrup! Otherwise, place the waffle on a baking rack so it doesn't get soggy. Cool waffles freeze well and can be reheated in a toaster or toaster oven on a busy morning!

makes 4 large, round waffles


Monday, August 5, 2013

Cooking when possible

I'll tell y'all a secret: When I'm not blogging about my cooking and eating habits, there's a good chance it's because they haven't been stellar. At least, that's been the case for a lot of this summer. (If it's during the school year and I'm not blogging, I'm probably just insanely busy.)

But! I'm finally into a relatively unscheduled week, and decided to celebrate by following these two simple steps:

  1. Go to the Pawtuxet Village Farmers' Market on Saturday morning. [Insert your local market or grocery, as applicable.] Buy a small quantity of a few different vegetables that look tasty.
  2. Consult Mark Bittman's How to Cook Everything Vegetarian to decide what to do with the haul.
I ended up with this delicious thing:

Pan-Grilled Corn with Chile (p. 289), plus grape tomatoes, because yum
I'll admit it: I love fresh, summer (or fall) corn, but eating it off the cob doesn't always appeal. This is a little bit because of the messiness, and a little more because it feels wasteful to boil a large pot of water, just to cook an ear or two for myself. So, I'm always on the lookout for a good off-the-cob recipe, and this one was fantastic: the corn got cooked just enough to bring out the natural sweetness, while staying crisp and fresh. The tomatoes were my own addition (along with a little olive oil), and because I only had two ears of corn v. the proscribed six, I probably ended up going a little heavy on the chile and garlic. I didn't mind.

And by the way? A thousand blessings on whoever thought of combining cilantro and lime juice. Probably someone in Mexico, centuries ago. Blessings, nonetheless.

I only wish I'd bought more corn!

Thursday, August 30, 2012

TGRWT #22 - Kelley's Cucumber Ice Cream Dream

Blog Owner's Note: This post features research and writing by fabulous guest blogger, Kelley Caspari! This is her entry into Round #22 of They Go Really Well Together. Click the link to learn more about this blog event and the science behind TGRWT. It's pretty cool stuff! And as always on this blog, the recipe is totally vegetarian (obviously not vegan) and gluten-free. And it sounds delicious!

***


A couple of years ago I had a dream. The only thing I could remember of it on waking was a delicious flavor of ice cream I'd had - cucumber-raisin. I actually mentioned this to an ice cream maker and he looked at me like I was unhinged. Ah well! I promised myself that one day I'd make it. And this month Khymos suggested a new TGRWT (They Go Really Well Together) starring the raisin! If that isn't the Fates calling me to  the task, I don't know what is...

I did a quick search on the web for cucumber ice cream, and there were several recipes. The one that sounded best included a bit of lemon and lime. He calls it "Cucumber Ice Cream: The Corrupter". He's right. This ice cream is delicious!

Next, I had to find a way to make the ice cream. I don't have an ice cream maker and I don't really want to own one. Fortunately, there is a method for making a single serving of ice cream in about 5 minutes with Ziploc bags. Here is a link describing that method.

That's the background. Now my "research":

I found that the Cucumber Ice Cream Corrupter was a bit to sweet for my purposes and taste, so I modified the recipe, both for sweetness and in reducing the amount of base for the technique I planned to use.

When I added raisins, I found that the ice cream melted in my mouth too quickly, leaving me chewing and chewing and chewing the raisins long after the cucumber flavor had disappeared. Even mincing them didn't help this problem. I settled on throwing the raisins into a food processor with honey and lemon juice and pureeing the heck out of it.

This makes 2 servings:

The Cucumber Ice Cream Base:

1/4 C half and half
1/4 C heavy cream
1 large cucumber, peeled, seeded, chunked
Peels from about 1/2 the cucumber
2 TBSP sugar
1/2 TBSP lime juice
1 TBSP lemon juice
Salt to taste

1. Purée the cucumber in a blender with the lemon and lime juice.

This can take a bit of patience, alternating blending with tamping the chunks of cucumber down until it starts to behave like a liquid in a blender.

2. Heat the half and half, cream, sugar, and cucumber peels over low heat until the sugar is just dissolved, stirring constantly.

The peel is supposed to add a green color, but it doesn't seem to do much in that department, so you could probably leave them out altogether, though I think it may add to the texture.

3. Strain the cucumber mixture into the cream and mix.

I questioned whether straining was necessary, and after trying it with and without, the final texture is remarkably improved by pushing the cucumber through a fin sieve.

4. Add salt to taste. I added just a pinch.

5. Chill at least 3 hours or overnight.

The Raisin-Honey-Lemon "Ribbon"

1/2 cup raisins
1 TBSP lemon juice
1TBSP honey

1. Put raisins in a small pot and just cover with water. Simmer until almost all of the water is gone. The remaining water will be a bit syrupy.

2. Put raisins with their syrup in a food processor with the lemon juice and honey. Purée until you are satisfied.


To freeze:

5 minute timer
1 gallon sized Ziploc bag
1 pint sized Ziploc bag
Ice to fill 1/2 of the gallon Ziploc bag
6 TBSP salt
previously made Cucumber Ice Cream recipe


1. Put serving bowls in the freezer. The ice cream can be a bit soft and melt quickly. A frozen bowl stalls the process.

2. Put Cucumber Ice Cream Base in the pint sized Ziploc bag, filling it about halfway. Fold the top over so most of the air is removed, and seal it.

3. Put salt and ice in the gallon sized Ziploc bag.

4. Put pint sized bag into the gallon sized bag, remove as much air as possible again, and seal the gallon sized bag.

5. Set a timer for 5 minutes

6. Shake, roll, knead, and whatever other movement you can think of to keep the bag moving. I favor rolling the bag in a kitchen towel to keep my fingers from freezing, and continuously rolling the bag over and over while roughly kneading it. Be rough! If you are too delicate out of fear the bags will lose their seal you will get soupy ice cream!

7. When your timer tells you 5 minutes have passed, pull the bowl from the freezer, take the pint sized bag from the gallon sized bag, and give it a quick rinse under cold water. This is essential unless you want salty water in your ice cream! I tend to give the pint sized bag a quick rub with the kitchen towel, too, just for insurance.

8. Empty the ice cream into your bowl.

9. Fold in about 2 TBSPs of the Raisin mixture very minimally. Too much and you will over power the cucumber flavor, so less is better if in doubt. You can even just spoon in a bit on the side if you prefer.

10. EAT! YUM!

Tips:
You can fit more than one pint sized bag into one gallon sized bag.

You can store this in the freezer, but it gets quite hard overnight.


***

Many thanks again to Kelley for all her work, and for sharing! Best of luck with this entry!

Sunday, May 6, 2012

Bourbon-Infused Popcorn

Okay, attempt number one at bourbon-infused popcorn.

I heard a bit on NPR a few weeks ago about a gourmet food show which included "artisanal" popcorn offerings. (And seriously? Can we just ban the word "artisanal" already?) But back to the topic at hand, in the course of the story, I heard a magical three words: Bourbon. Infused. Popcorn.

Not one to spend $12 on a few ounces of popcorn, I decided to try to make my own at home. The results were not as bourbon-ish as I was hoping, but definitely tasty.


I started with about 1/2 c. unpopped kernels and put them in a tiny jar with the last of a nip of Knob Creek, which was left over from an egg nog ice cream attempt back around Christmas. I probably had about 2 Tbs of bourbon, total, which wasn't enough to submerge all of the kernels. So, I turned the jar over periodically to distribute the bourbon as well as I could, while there was still excess liquid.

This probably sat around my kitchen for a couple of weeks. Another time, I would use a shallower dish, more bourbon, and also probably spread out the kernels to dry a bit after soaking for a shorter time, like overnight or so.

Anyway, I popped the popcorn as usual, with a generous drizzle of canola oil and about 1 tsp salt, in my Whirlypop, until the popping noises stopped. Meanwhile, I melted 1 Tbs unsalted butter in a small dish, about 30 seconds in the microwave.

Then, I transferred the popped popcorn to a muslin bag, drizzled in the butter, and sprinkled it with an additional pinch of salt (which I think was too much, I'll leave that out next time) and about 1 Tbs cinnamon-sugar, which is 2 parts sugar to 1 part ground cinnamon, and keeps indefinitely in a jar in the cupboard.

Like I said: not as bourbon-ish as I'd envisioned, but perfectly tasty popcorn. And I did get an occasional kernel that had a strong bourbon flavor.

Hmm, a work in progress ...